
Office integration is a framework that combines various technologies. It allows Dynamics 365 users to work with data in Office 365 apps, publish it back to Dynamics 365 F&O, and offers additional functionalities.
We will use Microsoft Office integration experiences that involve Microsoft Excel, Microsoft Word, the document management capabilities of finance and operations apps, and email.
- Entities and OData– You will use the Microsoft Dynamics Excel Data Connector App (Excel App) to create, read, update, and delete. The connector uses OData services that are created for any entity that is left in the default state of “public”.
- Apps for Office– The Excel App is built by using the Apps for Office framework (which is also known as the Office Web API). The Excel App is web-based, and therefore shares technology with the client and will run inside both on-premises Excel instances and Microsoft Excel Online (Microsoft 365). The app runs inside Excel in a task pane.
- Microsoft Office 2016– The Excel and Word Apps use advances in the Apps for Office framework that were introduced in Office 2016. Therefore, Office 2016 is required in order to run the Excel and Word Apps.
- Authentication– The Excel and Word apps run in a browser window inside Excel and Word. For details about which browser will be used for your configuration. The specified browser is used even if the user is running the client in an InPrivate browsing session in Microsoft Edge, or in a different browser such as Google Chrome. Authentication is facilitated by OAuth, and the user can select accounts and sign in within the app. The browser will first try to automatically sign the user in, so if you aren’t signed in as the correct user or if you have trouble signing in, you might need to force a sign-out from the app by using the sign-out link. After signing out, try to sign in again to the app.
- Excel App– In addition to facilitating refresh and publish data operations, the Excel App also provides source and field information, lookups, filtering, error messaging, and a design experience for adding or removing fields, table columns, or labels from entity data sources.
Excel Integration
Excel Integration comes with two basic options to export out data into Excel workbooks.
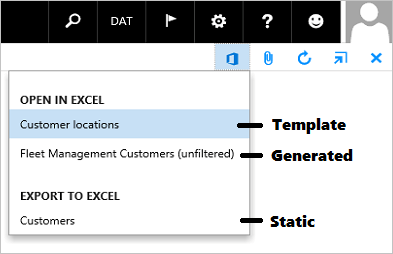
Static Export to Excel
- Static Export to Excel provides a quick mechanism for getting data into grids on a page. The standard mechanism for triggering Export to Excel is the Open in Microsoft Office Static Export to Excel is also available via a shortcut menu on the grid.
- In entities/Tables, rows which are marked can also be opened in workbook by right clicking. Export is currently limited to 2000 rows.
Open In Excel
Open in Excel has two kinds of options to open data in excel data connector.
- First one is Based on entities which have same root data source as form and the OData services that they create.
- Second type of menu item is added based on pre-defined template present in the system which can be user- defined or system-defined.
- The Open in Excel experiences utilize the Excel Add-in to facilitate refresh and publish.
Export to Word experiences
Export to Word experiences can be used for lightweight reporting. They are powered by pre-built templates. The Export to Word experiences are listed on the Open in Microsoft Office menu. Let’s look at an example experience that has been created for Fleet Management Customers.
Create a Word template
The Microsoft Dynamics App for Office can be run in Word to enable the creation of templates that can then be used for document generation.
- Create a blank document.
- Go to Common> Common > Excel workbook designer.
- Select Create blank document.
- Download and open the document that is generated.
- Sign in to the app:
- Select Sign In. The Azure Active Directory sign-in screen should provide a list of credentials. If you encounter an error, force a sign-out (by using the sign-out link), and then sign-in again.
- Select the appropriate account or click Use another account.
- Enter the credentials for that environment, and then click Sign in.
- Design the template from the entities listed and these can be published on document templates page in D365 Environment to be used later on.
Excel Add-In
- The Excel Data Connector app interacts with Excel workbooks and OData services that are created for publicly exposed data entities. The Excel Data Connector add-in enables Excel to become a seamless part of the user experience. The Excel Data Connector add-in is built by using the Office Web add-ins framework. The add-in runs in a task pane.
- This can be enabled from respective apps by inserting add ins and signing in with server name under my add-ins option. Excel files shared with add ins don’t require the add in to be installed again.
- When you click in a table cell, any lookup, enumeration drop-down list, or date picker that is associated with that cell will be shown inside the add-in, underneath the source and field information. Any value that you select inside the add-in is put into the currently selected table cell.
- To add a record, either start typing in a row directly below a table, or use the Tab key to tab away from the last cell of the last row in the table. To delete a record, select the row by clicking the row label (1, 2, 3, and so on), and delete all the cells in that row. To publish the changes, click Publish. The Messages dialog box shows how many records were added, edited, and deleted.
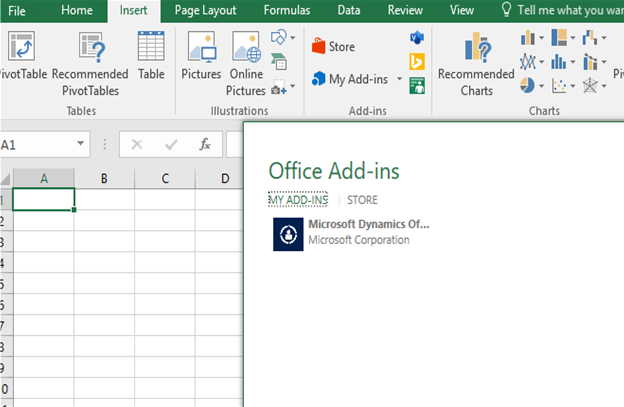
Open entity data in Excel when starting from Excel:
- In Excel, on the Insert tab, in the Add-ins group, select Store to open the Office Store.
- In the Office Store, search on the keyword Dynamics, and then select Add next to Microsoft Dynamics Office Add-in (the Excel add-in).
- If you’re running the Excel add-in for the first time, select Trust this Add-into enable the Excel add-in to run. The Excel add-in runs in a pane on the right side of the Excel window.
- Select Add server information to open the Options
- In your browser, copy the URL of your target finance and operations app instance, paste it into the Server URL field, and then delete everything after the host name. The resulting URL should have only the host name.
- Select OK, and then select Yes to confirm the change. The Excel add-in is restarted and loads metadata.
- The Design button is now available. If the Excel add-in has a Load applets link, you likely aren’t signed in as the correct user. Select Design. The Excel add-in retrieves entity metadata.
- Select Add table. A list of entities appears. The entities are listed in “Name – Label” format.
- Select an entity in the list, such as Customer – Customers, and then select Next.
- To add a field from the Available fields list to the Selected fields list, select the field, and then select Add. Alternatively, double-click the field in the Available fields
- After you’ve finished adding fields to the Selected fields list, make sure that the cursor is in the correct place in the worksheet (for example, cell A1), and then select Done. Then select Done to exit the designer.
- Select Refresh to pull in a set of data.
Deployment of Add-ins
Centralized Deployment is the recommended and most feature-rich way for most customers to deploy Office Add-ins to users and groups within any organization or to everyone in the organization.
This can be achieved through Centralized Deployment feature in the Microsoft 365 Admin Center, by locating it from office store and deploying it for a particular group of users or for the entire organization.
This can be achieved by following given steps:
- In the admin center, go to the Settings > Integrated apps > Add-ins page.
- Select Deploy Add-in at the top of the page, and then select Next.
- Select an option and follow the instructions.
- If you selected the option to add an add-in from the Office Store, make your add-in selection.
- On the next page, select Everyone, Specific users/groups, or Just me to specify who the add-in is deployed to. Use the Search box to find specific users or groups.
- Select Deploy.
- A green tick appears when the add-in is deployed. Follow the on-page instructions to test the add-in.
- When finished, select Next. If you’ve deployed to just yourself, you can select Change who has access to add-in to deploy to more users.
Some Important points to keep in mind for deployment
- When the relevant Microsoft 365 app starts, the add-in automatically downloads. If the add-in supports add-in commands, the add-in automatically appears in the ribbon within the Microsoft 365 app.
- If Admin turns off or deletes the add-in, or if the user is removed from Azure Active Directory or from a group that the add-in is assigned to, then the access to these add ins also gets removed.
Global admins and Exchange admins can assign an add-in to everyone or to specific users and groups. Each option has implications:
- Everyone: This option assigns the add-in to every user in the organization. Use this option sparingly and only for add-ins that are truly universal to your organization.
- Users: If you assign an add-in to an individual user, and then deploy the add-in to a new user, you must first add the new user.
- Groups: If you assign an add-in to a group, users who are added to the group are automatically assigned the add-in. When a user is removed from a group, the user loses access to the add-in. In either case, no additional action is required from the admin.
- Just me: If you assign an add-in to just yourself, the add-in is assigned to only your account, which is ideal for testing the add-in.
By integrating Microsoft Office with Dynamics, your team and organization will be able to seamlessly input and change data without having to duplicate work, which in turn will optimize and improve your business processes.
About the expert
 |
Vishakha Shamnani, Technical Consultant, OnActuate
Vishakha is experienced in development and customization for a variety of functionalities in Microsoft Dynamics 365 F&O and customizing Power BI and SSRS reporting and F&O integrations. Vishakha is currently certified in MB-500: Microsoft Dynamics 365: Finance and Operations Apps Developer and AZ-900: Microsoft Azure Fundamentals. |
The “OneByte” blog series are technical how-to articles by OnActuate’s expert consultants covering Microsoft Business Applications (Microsoft Dynamics, Power Platform) and related technologies. Have a topic you’d like to learn more about? Email us at info@onactuate.com!